First, as a disclaimer I am not a gunsmith. I am simply explaining something I did. I am NOT advocating anyone else to perform this procedure on any firearm, and if done wrong it can lead to dangerous conditions such as too light a trigger and/or accidental discharge. As they say, “Kids, don’t try this at home!”
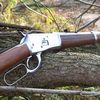
All the new leverguns and most of the used ones I have purchased in the last couple decades suffer from excessively heavy trigger pull. My Lyman Trigger Pull Gauge measures up to twelve pounds of pull, and many new leverguns will peg the gauge without dropping the hammer. This is not especially critical for a hunting gun, but as an NRA Cowboy Lever Action Silhouette competitor, I feel that a light trigger is essential on a target gun for good scores. Personally I like a trigger in the pound-and-a-half to two and a half pound range.
Traditionally I would use my stones to remove some metal from the leading edge of the hammer’s full cock notch, thus reducing the sear engagement depth and creating a lighter trigger pull. The disadvantage is that the hammer is permanently altered, and in one instance I removed too much metal and had to purchase a new $63 hammer. I felt there had to be a better way, and concluded I could use a shim to reduce the depth of the sear engagement without damaging the hammer.
I begin by measuring the existing trigger pull. The Lyman digital gauge is a vast improvement over the RCBS spring gauge I had before. It’s easier to use and is capable of averaging multiple pull tests. I use an average of five pulls, and this particular rifle had a five pound three ounce pull, not bad but heavier than I like.

I removed the hammer from the rifle and using a dial caliper measured the depth of the full cock sear notch. Experience has taught me that a depth of .020” or a bit less works well. This rifle had a notch .045” deep, so will need a .025” thick shim.


Since the trigger sear snaps into the hammer’s sear notch with some force, the shim should be made of steel. Rather than searching around for something that will work, I just buy a cheap set of feeler gauges. They are hard steel and have a very exact thickness. This time I am using a set purchased at a yard sale for a quarter.

Here I have removed the .025” blade from the feeler gauge set and used a bench grinder to reduce its width to about a eighth of an inch. I then use a stone to smooth off any roughness left by the grinding. I have intentionally left it well oversized as it is easier to handle.

Now it’s time for the adhesive. I suppose Super Glue would work, but I like JB Kwik, the fast-setting version of JB Weld epoxy. A very sparing amount is used to glue the shim piece into the hammer’s full cock notch, which has been cleaned and degreased for good adhesion. Any excess glue that squeezes out is carefully removed. The hammer is then set aside to cure.
After the glue cures, the excess shim stock is neatly cut off close to the hammer using a Dremel. Final fitting is done with a stone, and then I give it a good polish, again using the Dremel.

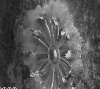
A final check with the dial caliper confirmed I had .020” sear notch depth, and here you see the finished hammer ready to go back into the gun. The arrow indicates the new shim.

Application of a good grease on the sear engagement and hammer pivot hole helps keep things running smoothly:

One other little trick I did on this particular 1873 was install a flatwasher shim (indicated by the arrow) between the flat mainspring and the lower tang. This reduces spring pressure without modifying the spring. The spring tension screw is snugged just enough to hold it in place without adding tension to the spring.

In the event I have to remove or replace the shim, it can be popped off with just a little heat and a razor knife. Then all I need to do is clean off the glue residue.

After reassembly, I again check the trigger pull. Two and a half pounds. Good!

SHASTA