DIY: Stevens Favorite breakdown and stock refinishing 1894

Welcome to the Leverguns.Com Forum. This is a high-class place so act respectable. We discuss most anything here ... politely.

Moderators: AmBraCol, Hobie

Forum rules
Welcome to the Leverguns.Com General Discussions Forum. This is a high-class place so act respectable. We discuss most anything here other than politics... politely.

Please post political post in the new Politics forum.
Post Reply
FatJackDurham
Senior Levergunner
Posts: 1067
Joined: Sun Jan 01, 2012 10:18 am
Location: Morrisville,vt

DIY: Stevens Favorite breakdown and stock refinishing 1894

Post by FatJackDurham »

Recently, I bought a Stevens Favorite Bicycle .22 rifle. I was hankering for a replacement for an old Hopkins & Allen rolling block .22 I had that I had sold. When I saw the Stevens in a gun store catering to used and antique guns, I was intrigued. I've seen the gun listed both as a rolling block and a falling block, but I think rolling block is more accurate. Anyway, I asked the proprietor if we could haggle some. He had a price on it that was appropriate to a mint condition, which this one is not. He said he had another buyer he had been trying to sell it to for a couple of months. I offered about 75% of the tagged price. The owner hmm'd a bit. He said he could do 80%. Then, he said he was offering the other guy only 90%.

I laughed. I asked why I got the sweet deal. Did he hate the other guy?

"Naw, he makes me work too hard, that's all."

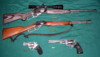
I waited two weeks to make sure I wanted it. Yeah, like that ever works. Anyways, payday came, and I bounced up the shop stairs, past the honest to god zebra hide, and went straight to the rack. It was there still, so it was mine.

The gun is a straight up project gun, in my humble assessment. The bore was seriously messed up. Lead, rust, pitting, grooves, etc. Receiver was a nice rust brown patina. Wood was nicked, dented, chipped urethane. And the hammer/mainspring is ridiculously stiff. So, after trying to find out how to break it down, I decided to take my chances. Maybe this will give some help to the next guy.

Step 1: Remove the barrel by twisting the bolt under the receiver.
Image

Remove the knurled nut and the stock.
Image

Step 2: Remove buttstock by removing screws on top and bottom of tang.
Image

For giggles, remove the shoulder plate.
Image

Step 3: Cock hammer to remove tension from breech block.
Image

Step 4: Drive out lever connector pin from right to left. Bad picture.
Image

Step 5: Remove lever pivot screw from left and remove lever. This screw also releases the extractor.
Image

Step 6: Drop breechblock down into receiver as far as it will go. CAREFULLY, release the hammer. With the breechblock fully lowered, the hammer will go forward far enough to fully release the spring. Note, if you need to recock the hammer at this point, you have to compress the spring with some pliers or a vice or something. Picture below step 8.

Step 7: Remove hammer pivot screw and remove hammer through the top of the receiver.

Step 8: Remove the mainspring screw and mainspring.
Image

Step 9: Remove trigger spring and screw.
Image

Step 10: Remove trigger pivot screw and remove trigger through bottom of the receiver.
Image

Step 11: Remove the breechblock pivot screw and remove the breechblock through the top of the receiver. No photo, but seriously, there is just one screw left on the receiver, so take a chance.

Step 12: Inside the receiver, there is a screw that holds the breechblock spring in place. Remove the screw and spring.
Image
Image

I tried to remove the other lever link pin and the firing pin out of the breechblock but couldn't.

Okay. So I decided to cold blue the receiver. I don't know if that brown patina is the original finish, but I wasn't hot on it. See my other post on DIY cold bluing. The receiver came out pretty good, but I will probably do it again.

The buttstock had a crack in it. Snicker. It's a butt crack.....
Image

A bit of two ton epoxy sorted that out. The buttstock was well used. Plenty of dents, scratches, and the urethane was not in top form. After consulting some guys at work, I sanded the wood down, cleaned it with mineral spirits and rubbed in some linseed oil.

The worst part of the gun aside from the bore, was the hammer tension. A boy's gun shouldn't require a grown man to use both hands to cock it. And I have strong thumbs. I was the fifth grade thumb wrestling runner-up, behind Vicki DeGregorio. She cheated.

The main spring is really thick, and kind of shaped like an S. The tip nearest the hammer is about a quarter inches long. I first tried to grind this down.
Image

That didn't work. But remember I did it. It's going to matter later.

The thing was, I thought, there is no easy or safe way to reduce the spring tension of steel. But, I thought if I could angle the spring slightly down, the tension wouldn't build as much while cocking the hammer.
Image

I always hated that screwdriver. Its glorious sacrifice made for a perfect wedge to tilt the spring slightly.
Image

I cut it off with a Dremel and tried the hammer. It was just about perfect. Hopefully, it would still fire.

I put the buttstock back on and, oh snap, the hammer slacked back a half inch. I removed the buttstock and the hammer tightened. Hmmm. When I ground down the tip of the spring, it allowed the mainspring to rise up a bit and the channel in the wood stock was pressing down on it.

That's okay. Problems are best when you have to buy a new tool. I bought a great little chisel at the wood workers store and carefully removed some material from the channel.

And voila.

Image

So I am totally an amateur. I am loving working on this gun, though. Now that it's looking good, I think I'll save up and have the barrel relined. Then it'll be perfect.
Last edited by FatJackDurham on Wed Jan 18, 2012 6:51 am, edited 1 time in total.
adirondakjack
Senior Levergunner
Posts: 1925
Joined: Mon Dec 17, 2007 7:09 pm
Location: Upstate NY
Contact:

Re: DIY: Stevens Favorite breakdown and stock refinishing

Post by adirondakjack »

So that's what the guts of my smooth bore .22 Favorite look like.

If I may be so bold, cold you PM me with what you paid for yours? I might be gonna put mine up for sale, and would like a clue what one actually brings.


FWIW I consider em a falling block (Just about like the Ithaca model 49 saddle gun I have). A true rolling block cams the block tight when the hammer falls.....
Certified gun nut
FatJackDurham
Senior Levergunner
Posts: 1067
Joined: Sun Jan 01, 2012 10:18 am
Location: Morrisville,vt

Re: DIY: Stevens Favorite breakdown and stock refinishing

Post by FatJackDurham »

adirondakjack wrote:So that's what the guts of my smooth bore .22 Favorite look like.

If I may be so bold, cold you PM me with what you paid for yours? I might be gonna put mine up for sale, and would like a clue what one actually brings.


FWIW I consider em a falling block (Just about like the Ithaca model 49 saddle gun I have). A true rolling block cams the block tight when the hammer falls.....
Sure, I'll pm you. Isnt a true falling block one that drops straight down on rails, like the breech of a Howitzer? Also, there were several different versions of the favorite, with minor changes. The main spring changed to a coil just after this model.
User avatar
Borregos
Advanced Levergunner
Posts: 4756
Joined: Thu Sep 13, 2007 7:40 am
Location: Ontario, Canada

Re: DIY: Stevens Favorite breakdown and stock refinishing 1894

Post by Borregos »

Interesting post, looks good :D
Pete
Sometimes I wonder if it is worthwhile gnawing through the leather straps to get up in the morning..................
FatJackDurham
Senior Levergunner
Posts: 1067
Joined: Sun Jan 01, 2012 10:18 am
Location: Morrisville,vt

Re: DIY: Stevens Favorite breakdown and stock refinishing 1894

Post by FatJackDurham »

Lesson learned, though, I sanded too much off near the receiver so the stock is too narrow. Maybe some day, I'll try to. Fix it. I could trim the stock a little and work the tang slots back, but I think before I do that, I'll try making a stock from scratch to practice fitting it. I saw that other post here where a guy did a new stock for a Steven's and it looked amazing.
Bill in Oregon
Advanced Levergunner
Posts: 8952
Joined: Sun Jun 29, 2008 10:05 am
Location: Sweetwater, TX

Re: DIY: Stevens Favorite breakdown and stock refinishing 1894

Post by Bill in Oregon »

Lost: Man, I tip my hat to you. The Stevens Favorites simply ooze charm, and you are obviously giving yours every kind attention. Can't wait to see you get her lined and then up and running again. You have me hurting for one.
I've had an original, and the 30G Savage. On that one I mounted a Lyman globe front and a replica tang rear for a mini-schuetzen rifle. Too bad the trigger was so coarse:

Image
FatJackDurham
Senior Levergunner
Posts: 1067
Joined: Sun Jan 01, 2012 10:18 am
Location: Morrisville,vt

Re: DIY: Stevens Favorite breakdown and stock refinishing 1894

Post by FatJackDurham »

Bill in Oregon wrote:Lost: Man, I tip my hat to you. The Stevens Favorites simply ooze charm, and you are obviously giving yours every kind attention. Can't wait to see you get her lined and then up and running again. You have me hurting for one.
I've had an original, and the 30G Savage. On that one I mounted a Lyman globe front and a replica tang rear for a mini-schuetzen rifle. Too bad the trigger was so coarse:

Image
The store had a Savage there for a lot less, but it didn't feel as nice, or as solid. It may not have been as well cared for as yours, kind of rattled a little. I also wasn't enamoured with the hammer and breechblock. But, you make me wonder. I am thinking about a tang site, however, with a take down gun that is less than precision machined, wouldn't you have to re-zero every time you put it back together? How did you savage hold up?

By coarse, do you me the trigger pull and break wasn't clean? The trigger on mine breaks perfectly. I am really lucky, both my Rossi and Stevens have excellent trigger weight and pull.
FatJackDurham
Senior Levergunner
Posts: 1067
Joined: Sun Jan 01, 2012 10:18 am
Location: Morrisville,vt

Re: DIY: Stevens Favorite breakdown and stock refinishing 1894

Post by FatJackDurham »

By the way, what is a "Sheutzen?"
Bill in Oregon
Advanced Levergunner
Posts: 8952
Joined: Sun Jun 29, 2008 10:05 am
Location: Sweetwater, TX

Re: DIY: Stevens Favorite breakdown and stock refinishing 1894

Post by Bill in Oregon »

Lost: The Savage 30G has design improvements, but a lot of the casting marks are apparent, and I found the trigger pull heavy and rough.
I don't think you would have a lot of zero problems if you mounted a tang from Jeff's Outfitters like the one pictured. I suspect the takedown joint is actually pretty repeatable, but experience would tell.
A real schuetzen rifle would have a very high-cheeked perch belly stock with hooked buttplate, the rifle designed for head-erect target competition. I just thought the 30G with tang and globe sights reminded me a bit of one.

Here's one on a Stevens action from CPA

http://www.google.com/imgres?hl=en&clie ... 29,r:0,s:0
FatJackDurham
Senior Levergunner
Posts: 1067
Joined: Sun Jan 01, 2012 10:18 am
Location: Morrisville,vt

Re: DIY: Stevens Favorite breakdown and stock refinishing 1894

Post by FatJackDurham »

Yeah, I wasn't sure what made it a Sheutzen, if it was the stock, the action, the lever design, etc.

Thanks.

I agree the modern Savage has some improvements, like the coil main spring, and probably modern alloy strength. Also, the styling is quite nice. What can you do to improve the trigger?
damienph
Senior Levergunner
Posts: 1734
Joined: Mon Mar 30, 2009 11:11 am
Location: Kansas

Re: DIY: Stevens Favorite breakdown and stock refinishing 1894

Post by damienph »

I am still trying to decide if I want to have the barrel relined on my Favorite. Mine was in rough shape when I got it. I wish that I had taken "before" pictures. It looks better now but the barrel is ROUGH!

Image
Image
Image
Bill in Oregon
Advanced Levergunner
Posts: 8952
Joined: Sun Jun 29, 2008 10:05 am
Location: Sweetwater, TX

Re: DIY: Stevens Favorite breakdown and stock refinishing 1894

Post by Bill in Oregon »

Damien, that's a beauty. Nice hint of stripe in the forearm too.
Dixie used to sell a relining kit that included a drill bit and a chamber reamer. You'd fresh out the bore then slip in the liner and fix it in place with JB Weld or Acraglass, then do the chamber. I think someone still offers these -- maybe Brownells?
Lost: I sold the 30G before having a trigger job done. Can't say what would have been involved, but I'm sure the trigger could have been improved.
I miss that little gun. It was a joy to carry along on a hike out in the sagebrush in rattlesnake and rabbit country.
damienph
Senior Levergunner
Posts: 1734
Joined: Mon Mar 30, 2009 11:11 am
Location: Kansas

Re: DIY: Stevens Favorite breakdown and stock refinishing 1894

Post by damienph »

Thank you Bill, I had a lot of fun working on that rifle. It had remnants of a gold paint job on it, including the wood. I bought it in a box in pieces at a gun show a few years ago. I only have about $100 in it including the purchase price and two replacement screws that I had to buy. I wasn't sure that it was worth sending off for a reline, but if I can get a kit to reline it myself, I would like to try that.

Thanks for the tip on Brownell's

--Damien
FatJackDurham
Senior Levergunner
Posts: 1067
Joined: Sun Jan 01, 2012 10:18 am
Location: Morrisville,vt

Re: DIY: Stevens Favorite breakdown and stock refinishing 1894

Post by FatJackDurham »

Very nice. I think I read your other post about relining. I wish I only had $100 into mine.

I saw the Dixie or Brownell relining kit, too. How do you do the chamber, though? Seems like that would have to be pretty precise. I am not sure I want to go that far on DIY, though I saw Dixie had a spare barrel for sale. It might be fun, though expensive, to buy the extra barrel and reline it using the kit. If anyone does the relining at home, post details, please.
FatJackDurham
Senior Levergunner
Posts: 1067
Joined: Sun Jan 01, 2012 10:18 am
Location: Morrisville,vt

Re: DIY: Stevens Favorite breakdown and stock refinishing 1894

Post by FatJackDurham »

Bill in Oregon wrote:Damien, that's a beauty. Nice hint of stripe in the forearm too.
Dixie used to sell a relining kit that included a drill bit and a chamber reamer. You'd fresh out the bore then slip in the liner and fix it in place with JB Weld or Acraglass, then do the chamber. I think someone still offers these -- maybe Brownells?
Lost: I sold the 30G before having a trigger job done. Can't say what would have been involved, but I'm sure the trigger could have been improved.
I miss that little gun. It was a joy to carry along on a hike out in the sagebrush in rattlesnake and rabbit country.
Strange isn't it? People go gaga over winchesters, ARs, etc, but these simple little kid's guns grab us and don't let go. That Hopkins & Allen I let go was the model that had a little Indian head engraved on the receiver, I would have done it in a minute. That one I had bought for just $100.

Damien, can you share with us all the work you did and how you did it? The stock looks beautiful. Does the shoulder pad sit flush? On mine, it's not a good mate, and I don't know how to fix it, if there is a technique to getting a good mating.
jdad
Advanced Levergunner
Posts: 3435
Joined: Fri Sep 07, 2007 7:55 am
Location: Oregon

Re: DIY: Stevens Favorite breakdown and stock refinishing 1894

Post by jdad »

Nice photo essay. The Stevens action is a simple, but effective design.

This a Stevens 49 that I had Paul Shuttleworth (CPA Rifles) put together for me. The sights and final fit & finish of the wood was my doing. I used Pilkington's clear finish. Expensive, but the results cure to a varnish.


Image
I know a whole lot about very little and nothing about a whole lot.
awp101
Advanced Levergunner
Posts: 5670
Joined: Mon Apr 09, 2007 7:13 pm
Location: DeeDee Snavely's Used Guns and Weapons

Re: DIY: Stevens Favorite breakdown and stock refinishing 1894

Post by awp101 »

Bill in Oregon wrote: Here's one on a Stevens action from CPA
Image
Achingly beautiful...
damienph wrote:I am still trying to decide if I want to have the barrel relined on my Favorite. Mine was in rough shape when I got it. I wish that I had taken "before" pictures. It looks better now but the barrel is ROUGH!
Numrich used to sell new replacement barrels. I had one about 10 years ago when I had a Favorite but sold it all before tweaking the barrel for final fitting.
Lostowl05661 wrote: Strange isn't it? People go gaga over winchesters, ARs, etc, but these simple little kid's guns grab us and don't let go.
For me it's just about any rimfire .22, regardless of configuration.
jdad wrote: This a Stevens 49 that I had Paul Shuttleworth (CPA Rifles) put together for me. The sights and final fit & finish of the wood was my doing. I used Pilkington's clear finish. Expensive, but the results cure to a varnish.


Image
Image
Nothing so needs reforming as other people's habits.
-Mark Twain

Proverbs 3:5; Philippians 4:13

Got to have a Jones for this
Jones for that
This running with the Joneses boy
Just ain't where it's at
FatJackDurham
Senior Levergunner
Posts: 1067
Joined: Sun Jan 01, 2012 10:18 am
Location: Morrisville,vt

Re: DIY: Stevens Favorite breakdown and stock refinishing 1894

Post by FatJackDurham »

Wow! How did you do the tiger stripe on the receiver? And what is the secret to a good wood to metal fit?
awp101
Advanced Levergunner
Posts: 5670
Joined: Mon Apr 09, 2007 7:13 pm
Location: DeeDee Snavely's Used Guns and Weapons

Re: DIY: Stevens Favorite breakdown and stock refinishing 1894

Post by awp101 »

Dang it, I'm starting to get thoughts and ideas... :lol:
Nothing so needs reforming as other people's habits.
-Mark Twain

Proverbs 3:5; Philippians 4:13

Got to have a Jones for this
Jones for that
This running with the Joneses boy
Just ain't where it's at
jdad
Advanced Levergunner
Posts: 3435
Joined: Fri Sep 07, 2007 7:55 am
Location: Oregon

Re: DIY: Stevens Favorite breakdown and stock refinishing 1894

Post by jdad »

Lostowl05661 wrote:Wow! How did you do the tiger stripe on the receiver? And what is the secret to a good wood to metal fit?
Stevens used a cyanide method of case coloring/hardening. The metal was heated red hot then dipped into molten cyanide.....giving it the "tiger stripes". You can send your receiver and lever, to CPA, and they will do it. It may take several months, for them to get enough receivers to make it financially feasible, but they will do it.

This is the best explanation, on how to fit a stock......time & patience.
http://treebonecarving.com/id21.html
I know a whole lot about very little and nothing about a whole lot.
damienph
Senior Levergunner
Posts: 1734
Joined: Mon Mar 30, 2009 11:11 am
Location: Kansas

Re: DIY: Stevens Favorite breakdown and stock refinishing 1894

Post by damienph »

Lostowl05661 wrote: Damien, can you share with us all the work you did and how you did it? The stock looks beautiful. Does the shoulder pad sit flush? On mine, it's not a good mate, and I don't know how to fix it, if there is a technique to getting a good mating.
As far as the condition of the rifle when I got it; the receiver and barrel had quite a bit of surface rust on it and some fairly deep pits on both. Plus the flats on the barrel had channel lock marks on it where it mates to the receiver. I am guessing some past owner didn't realize that the knurled screw (with the ring on it) on the bottom of the receiver needed to be loosened to remove the barrel. Or I guess that it could have been stuck and gripping and twisting the barrel with the bare jaws of channel lock pliers seemed like the most appropriate way to remove it...

I draw filed the receiver and barrel flats and used a stand mounted belt sander to smooth the round portion of the barrel. I bought the files as a "gunsmithing file set" from Midway. After filing, I used 3M brand automotive sand paper starting with 150, 320, 400, 600, and then 1500 grit to progressively polish the metal. I completely disassembled the rifle, cleaning each part and either leaving it bright or bluing the part. For example, the trigger is completely blue but the hammer is blue except for the sides that are highly polished and left in the white. For bluing, I used Birchwood Casey Perma Blue Paste. (This paste has given me the best cold blue than any others and I have used a BUNCH of different cold blues over the years - most have ranged from less than satisfactory {including liquid Birchwood-Casey} to outright awful) I applied six or seven "coats" of the paste until I was satisfied with the finish.

I then polished the metal again with the 1500 grit paper to soften the blue and try to make it look worn with age. I get a lot of complements on it. I've had several people ask if it was my grandfather's gun.

The wood was in pretty good shape except for the remnants of the gold paint job that left paint imbedded in the grain. I first stripped it with a chemical paint stripper (EZ Strip? - from Ace Hardware), then used a foam oven cleaner to get the rest of the paint out of the wood grain. After that I sanded it down with 400 and then 600 grit paper. No stain, I just handrubbed four coats of Birchwood Casey Tru Oil stock finish and then lightly buffed the stock (and forearm) with 0000 fine steelwool to soften the gloss finish and then buffed it with a soft cloth and applied a coat of Johnsons furniture wax.

I was lucky that the buttplate was in good shape, no cracks or chips, and it fit well. I tried to remove it but the screws wouldn't move and I didn't want to risk buggering them up so I just left it in place. I did, however cover it with masking tape and made an effort to keep the stripper and oven cleaner off of it because I didn't know how they might affect the hard rubber (plastic?).

I cleaned the gold paint off of it with Hoppes #9 and a stiff nylon brush. Most of it was already worn off but the rest cleaned up fairly easily. I waxed the buttplate as well.

I am guessing that I spent around 20 - 30 hours over a four month period redoing this rifle.

It was time consuming but I learned alot about using files and sandpaper on metal; especially keeping the files clean and using a block with the paper to ensure that flat surfaces stay flat.

I am very happy with the outcome and will try to take better pictures of it if there is any interest because the ones that I have posted really do not do it justice.

Thanks for the interest and complements!
FatJackDurham
Senior Levergunner
Posts: 1067
Joined: Sun Jan 01, 2012 10:18 am
Location: Morrisville,vt

Re: DIY: Stevens Favorite breakdown and stock refinishing 1894

Post by FatJackDurham »

Wonderful. What problems did you have with the Birchwood Casey that the paste improved on? The Perma Blue I used leaves things more grey than black. I tried some Super Blue last night and it worked with far fewer coats, but, then, it turned the metal blue and red instead of black.... They have the paste at the store where I bought the liquid, maybe I'll go and get it. What did you use as an applicator and how did you treat it at the end? I have been just oiling it and letting it sit over night.
damienph
Senior Levergunner
Posts: 1734
Joined: Mon Mar 30, 2009 11:11 am
Location: Kansas

Re: DIY: Stevens Favorite breakdown and stock refinishing 1894

Post by damienph »

Lostowl05661 wrote:Wonderful. What problems did you have with the Birchwood Casey that the paste improved on? The Perma Blue I used leaves things more grey than black. I tried some Super Blue last night and it worked with far fewer coats, but, then, it turned the metal blue and red instead of black.... They have the paste at the store where I bought the liquid, maybe I'll go and get it. What did you use as an applicator and how did you treat it at the end? I have been just oiling it and letting it sit over night.

I find that the paste is easier to apply evenly. I use square cotton pads that my wife gave me. She uses them to remove makeup or something. I think that they are 2" square and flat. I follow the instructions on the tube except that I do not remove old bluing, unless I sanded or polished it off as part of the repair/project. After applying, I let it sit for about a minute or so and gently wipe it off with a clean cotton pad, then I rinse it with cold water and coat it with oil. I use Rem-Oil because I happen to have a few large containers of it that were given to me. I let it sit for a minimum of 24 hours before a apply another "coat" of paste. I clean the oil off with denatured alcohol before applying the paste.

I've found that I need to apply a minimum of 2 coats and I have applied I think 8 coats on the magazine tube of my BL22 before I could get it to match the barrel (which only took 3 coats to get the color that I wanted. The paste gives a blue-black finish that I think looks pretty good. One important step is to take it outside in the sunlight before you consider the project finished; the blue looks alot different in natural sunlight than it does indoors.
FatJackDurham
Senior Levergunner
Posts: 1067
Joined: Sun Jan 01, 2012 10:18 am
Location: Morrisville,vt

Re: DIY: Stevens Favorite breakdown and stock refinishing 1894

Post by FatJackDurham »

Did you steel wool between coats?
damienph
Senior Levergunner
Posts: 1734
Joined: Mon Mar 30, 2009 11:11 am
Location: Kansas

Re: DIY: Stevens Favorite breakdown and stock refinishing 1894

Post by damienph »

Lostowl05661 wrote:Did you steel wool between coats?
Yes, I did. I lightly buffed it with dry 4/0 (0000) steel wool; no oil on it.
Indigo22
Levergunner 1.0
Posts: 51
Joined: Sat Aug 17, 2013 4:41 pm
Location: New Hampshire, Seacoast

Re: DIY: Stevens Favorite breakdown and stock refinishing 18

Post by Indigo22 »

Question... FatJack in your pictures you show the breech block spring after removal and a glimpse of it inside the frame. How exactly is that oriented inside? Obviously the person who re assembled mine did not know.
http://i1170.photobucket.com/albums/r52 ... 65a61e.jpg
It can be seen peeking out in front of the lever. I picked the rifle up a couple days ago and thought it looked strange so I started searching for info. Most if not all exploded views of the Savage Favorites don't even show this spring. I was glad to find this thread to say the least.
http://i1170.photobucket.com/albums/r52 ... 4162bf.jpg
More photos... showing that it is in decent shape.
http://i1170.photobucket.com/albums/r52 ... 7f4b8e.jpg http://i1170.photobucket.com/albums/r52 ... 076c94.jpg
SN/ O 80
John

No matter what he does, every person on earth plays a central role in the history of the world. And normally he doesn't know it.

Paulo Coelho
Indigo22
Levergunner 1.0
Posts: 51
Joined: Sat Aug 17, 2013 4:41 pm
Location: New Hampshire, Seacoast

Re: DIY: Stevens Favorite breakdown and stock refinishing 18

Post by Indigo22 »

And my thrill of getting a new rifle is slipping... that spring had been damaged ... two cracks. Also the firing pin seems to be a non floating unit. Is it supposed to be spring loaded?
John

No matter what he does, every person on earth plays a central role in the history of the world. And normally he doesn't know it.

Paulo Coelho
User avatar
AJMD429
Posting leader...
Posts: 32056
Joined: Sun Sep 09, 2007 10:03 am
Location: Hoosierland
Contact:

Re: DIY: Stevens Favorite breakdown and stock refinishing 18

Post by AJMD429 »

I like threads like this one - practical stuff about restoring 'classic' firearms (even though this one isn't exactly a 'levergun' :wink: ).

Indigo22 - don't get too bummed; many small parts can be made from scraps of metal, other gun parts, or sometimes made by altering some basic screw or part you'd buy at your local Ace Hardware. Once you're done with the project it is all the better because of the innovation you had to use to get it completed. Especially with low-pressure rounds like a 22 LR, you can safely fabricate lots of the parts that wear out after a hundred years or so.
Doctors for Sensible Gun Laws
"first do no harm" - gun control LAWS lead to far more deaths than 'easy access' ever could.


Want REAL change? . . . . . "Boortz/Nugent in 2012 . . . ! "
Indigo22
Levergunner 1.0
Posts: 51
Joined: Sat Aug 17, 2013 4:41 pm
Location: New Hampshire, Seacoast

Re: DIY: Stevens Favorite breakdown and stock refinishing 18

Post by Indigo22 »

I am sure I can fabricate the needed spring. What I need now is to be able to gather enough information from someone to proceed with what may now be a project. Patent on the barrel says it is a 1894 model while some of the internals suggest it is a non side plate 1889, variant or early bastard model change over, or parts gun ... ? Not sure... Paid a good chunk of change for it, they said it was in working order. It is in good shape. Plans at the moment are to keep it and get it running.
John

No matter what he does, every person on earth plays a central role in the history of the world. And normally he doesn't know it.

Paulo Coelho
Pete44ru
Advanced Levergunner
Posts: 11242
Joined: Sun Sep 02, 2007 7:26 am

Re: DIY: Stevens Favorite breakdown and stock refinishing

Post by Pete44ru »

FatJackDurham wrote:
adirondakjack wrote:
FWIW I consider em a falling block (Just about like the Ithaca model 49 saddle gun I have). A true rolling block cams the block tight when the hammer falls.....
Isnt a true falling block one that drops straight down on rails, like the breech of a Howitzer?

By the way, what is a "Sheutzen?"

FWIW - Neither the Ithaca M49 nor the Favorite are falling-block actions, which don't pivot like rolling blocks, swinging blocks, or martini actions. (A FB travels up/down @ a slight angle to the bbl c/l, usually through linkage)

The Ithaca M49 is a Matrini-type pivoting block action; the Favorite is a "swinging block" action due to it's pivot lying ahead of the rear end of the barrel.

IIRC, this past Spring's issues of Shooting Times Magazine (?) had a series of Favorite gunsmithing/rebuilding articles with pics, that were excellent.

"Sheutzen" (Ger) means (AFAIK) literally "a shoot", IOW a shooting.

A "Sheutzenfest" is a German-type off-hand rifle shooting match.

A Scheutzen rifle can be any rifle (there's been all sorts of actions used in many different calibers), that's been set up for that type of shooting - typically a barrel heavier than a hunting rifle, precise sights, buttstocks with raised combs to accommodate the standing/offhand position, and most times a palm rest so the off hand can support that heavy bbl in shooting position easier than if the forearm were held.


.


.
Last edited by Pete44ru on Mon Aug 19, 2013 11:59 am, edited 1 time in total.
FatJackDurham
Senior Levergunner
Posts: 1067
Joined: Sun Jan 01, 2012 10:18 am
Location: Morrisville,vt

Re: DIY: Stevens Favorite breakdown and stock refinishing 18

Post by FatJackDurham »

Indigo,

yeah, that spring goes the other way for sure.

Wisners inc sells springs and stuff for the Stevens. That is where I bought a replacement spring for mine. That receiver is gorgeous. How is the bore?

Sorry I didn't answer sooner, I didnt notice someone had revived this thread.
FatJackDurham
Senior Levergunner
Posts: 1067
Joined: Sun Jan 01, 2012 10:18 am
Location: Morrisville,vt

Re: DIY: Stevens Favorite breakdown and stock refinishing 18

Post by FatJackDurham »

The way the spring is resting on the towel is how it rests inside the receiver. That bulge is what holds the breach open ( I think ) when you have it all the way down. So, convex side up.

My firing ping is not sprung, but it moves freely. If yours doesn't, you may risk setting off the rounds when closing the breech. Otherwise, the pin just sets agains the cartridge as the breech closes.

I really like your receiver color. Although, I am love mine since I had it relined and reblued at Bose's guns in Nebraska, I now sort of wish I had taken a second though about the receiver and maybe not sanded the patina off.
barbarossa
Senior Levergunner
Posts: 1124
Joined: Sat Sep 29, 2007 1:46 pm

Re: DIY: Stevens Favorite breakdown and stock refinishing 18

Post by barbarossa »

I have one of the Varner Stevens replicas

Image
FatJackDurham
Senior Levergunner
Posts: 1067
Joined: Sun Jan 01, 2012 10:18 am
Location: Morrisville,vt

Re: DIY: Stevens Favorite breakdown and stock refinishing 18

Post by FatJackDurham »

Nice.....
Indigo22
Levergunner 1.0
Posts: 51
Joined: Sat Aug 17, 2013 4:41 pm
Location: New Hampshire, Seacoast

Re: DIY: Stevens Favorite breakdown and stock refinishing 18

Post by Indigo22 »

FatJackDurham

The bore looks promising. I'll be running a boresnake through it soon. A good picture of the bore will follow. A thorough deep cleaning is direly needed of all parts. The receiver looks to be either nickled or chromed with a patina... ie finger/hand print lines covering it. Pictures coming here too. The butstock has a minor wiggle that can hopefully be snugged up with a good coat of some sort of wood moisturizing oil (still to be determined). Tung oil or lemon oil? I don't want to alter the finish really. The stock screws are already tight.
I'd love to find a tang sight for the rifle but a Skinner peep sight mounted on the barrel may work for me. I took a couple minutes and made a replacement spring today. The original snapped in half as I was comparing profiles. Horrors of horrors the new one is made out of stainless steel spring steel. It looks to be close but it's shiny. I'll watch for material that I can blue properly to make another one out of later.
Looking at Wisners web site says I should have a chisel point firing pin, mine is round... Hmm, yet another variant...
John

No matter what he does, every person on earth plays a central role in the history of the world. And normally he doesn't know it.

Paulo Coelho
FatJackDurham
Senior Levergunner
Posts: 1067
Joined: Sun Jan 01, 2012 10:18 am
Location: Morrisville,vt

Re: DIY: Stevens Favorite breakdown and stock refinishing 18

Post by FatJackDurham »

Why not a descreet glass bedding to firm up the stock fit?
Rusty
Advanced Levergunner
Posts: 9528
Joined: Mon Sep 03, 2007 6:37 pm
Location: Central Fla

Re: DIY: Stevens Favorite breakdown and stock refinishing 18

Post by Rusty »

I have a Stevens Favorite I bought new 7 or 8 years ago. I think. I lose track of time. Mine is .22 mag. When I got it the folks at the gun shop are a dealer for Green Mountain barrels. they told me then that if I wanted to they would fit a Green Mtn barrel in either .17 HMR or .22 LR to mine to make it more versatile. They said the Grn Mtn barrels for the 10/22 are a really close fit and could be fitted with out too much work.
If you're gonna be stupid ya gotta be tough-
Isiah 55:8&9

It's easier to fool people than it is to convince them they have been fooled.
Post Reply