OT: Update on my Blacksmithing

Welcome to the Leverguns.Com Forum. This is a high-class place so act respectable. We discuss most anything here ... politely.

Moderators: AmBraCol, Hobie

Forum rules
Welcome to the Leverguns.Com General Discussions Forum. This is a high-class place so act respectable. We discuss most anything here other than politics... politely.

Please post political post in the new Politics forum.
Post Reply
User avatar
JReed
Advanced Levergunner
Posts: 5509
Joined: Tue Apr 03, 2007 11:17 am
Location: SoCal

OT: Update on my Blacksmithing

Post by JReed »

Some of you may have been following this Topic http://www.levergunscommunity.com/viewt ... =1&t=25828

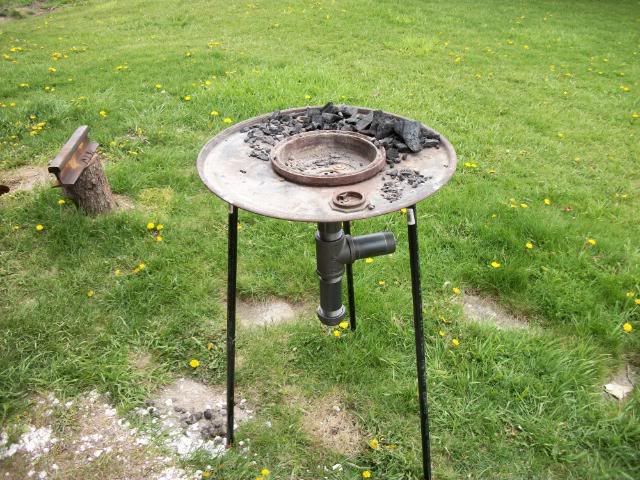
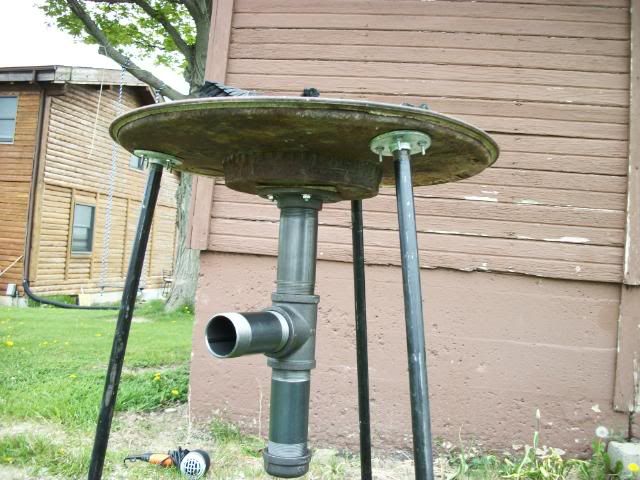
Well I have been improving my set up. I got tired of being hunched over on the ground it was killing my back. So it was time to make an ergonomic change. I took the drum lid and cut a hole in the center with my trusty Dremel big enough for the brake drum to fit into allowing the lip of it to rest on the lid. Then I went to the local handy dandy Home Depot and picked up 3 1/2 floor flanges and 3 1/2X30 threaded nipples to act as table legs an bolted them up to the under side of the lid. The next part of the project was how to feed air to the fire pot. First I had to come up with an air supply so off I go to the local Goodwill store were I was able to get a second hand hair dryer for $5. Then down the road to the plumbing supply store for the fittings. I got two 2"X6" threaded nipples, One 2"X4" threaded nipple, One 2" Tee, One 2" floor flange, and One 2" pipe cap (note all peices are black iron the use of galvanized parts subjected to high temps gives off toxic fumes that can kill you :shock:) .

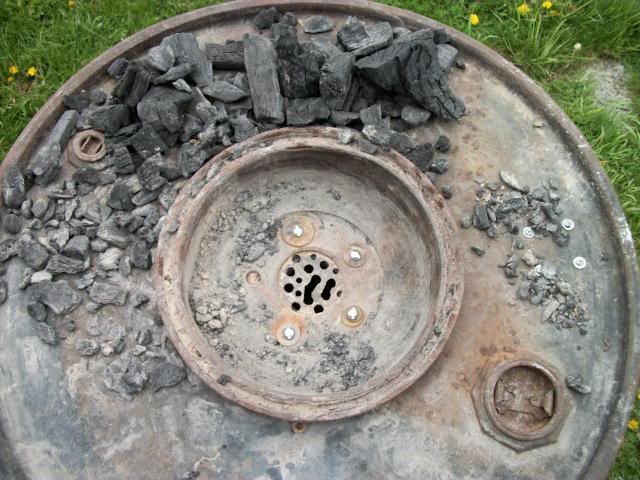
To put it all together. First off I had to drill new holes in the flange as the break drum is of a 5 lug set up and the flange only has 4 holes. After that it was just a mater of bolting the flange to the drum and screwing all the rest of the parts to the flange (I wont go into detail the pics explain it).

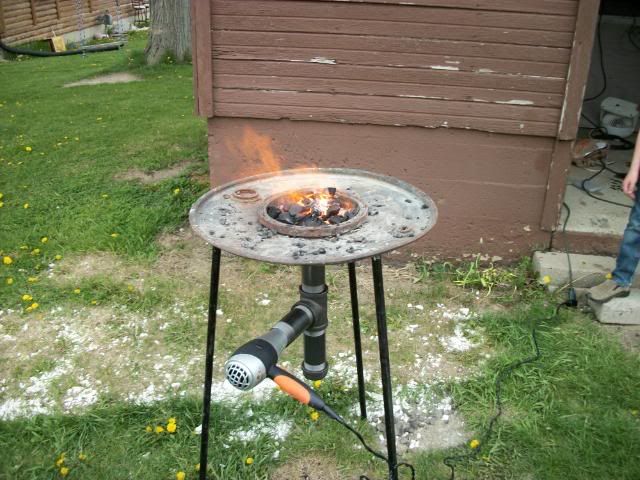
I lit it up to check function HOLY MOSSES this thing really gets hot fast. :lol: This is a night and day difference from the old forge. The old set up worked but it was a kin to a 4 cylinder this thing is a ticked off V8 HEMI. :D Well enough of my rambling on to the pics.
Here it is all put together ready to go.
Image

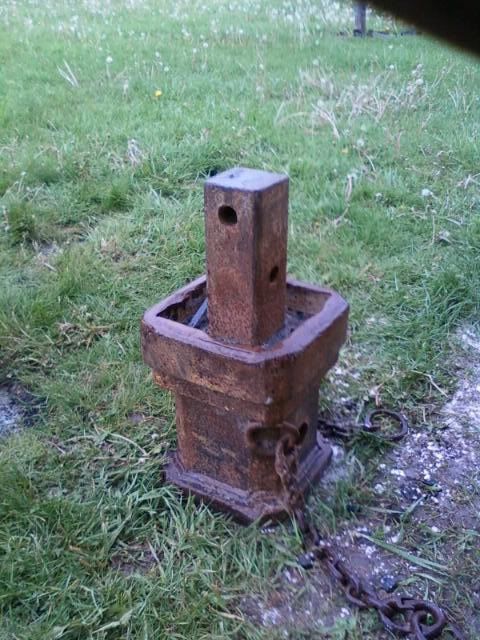
A shot of the underside to show how all the fittings mate together.
Image

Inside the firebox. I made the grate out of a piece of sheet metal.
Image

Flame on :D The hair dryer is on its lowest setting I found out quick that putting it on high sends flaming coals 3' in the air :o
Image

Here is a railroad spike that I am turning into a small tomahawk for my youngest.
Image
Jeremy
GySgt USMC Ret

To err is human, To forgive is devine, Neither of which is Marine Corps policy
Semper Fidelis
Idiot
Levergunner 3.0
Posts: 767
Joined: Fri Feb 22, 2008 1:56 pm
Location: Southwest USA

Re: OT: Update on my Blacksmithing

Post by Idiot »

JReed, good job. Other than being kinda small, it looks like that forge will get it done. I want to build one using a truck rim so I can have a bigger fire for a little more coverage. At this point though it no more than a mark on a list of things to do. Again, good job.

I used to work on a large cattle ranch and fed hundreds of steers each morning using a hay grinder that was built around the turn of the last century. When parts broke, there were no replacements, and I built them using a torch and a forge to get the ol' gal back up and the steers fed. For recreation, since the forge was only 50 yards from my trailer, I beat various pieces of steel into spurs and bits for the fun of it. The ranch had a full forge complete with tools and a good anvil. I sure miss it.

Have fun. :D

Oh, you need a proper anvil - more easily said than done. :wink:
User avatar
J Miller
Member Emeritus
Posts: 14885
Joined: Sat Mar 31, 2007 7:46 pm
Location: Not in IL no more ... :)

Re: OT: Update on my Blacksmithing

Post by J Miller »

Jeremy,

That is a pretty ingenious piece of home engineering. My first thought was it would work really well for melting wheel weights to make ignots from.

Joe
***Be sneaky, get closer, bust the cap on him when you can put the ball where it counts ;) .***
User avatar
2ndovc
Advanced Levergunner
Posts: 9352
Joined: Fri Sep 07, 2007 11:59 am
Location: OH, South Shore of Lake Erie

Re: OT: Update on my Blacksmithing

Post by 2ndovc »

Pretty slick Gunny!!

Also, thanks for putting in the warning about galvanive pipe.
Friend of mine almost killed himself trying to weld a piece of galvanized steel.
I had no idea before that it was so toxic!!


jb 8)
jasonB " Another Dirty Yankee"


" Tomorrow the sun will rise. Who knows what the tide could bring?"
Don McDowell

Re: OT: Update on my Blacksmithing

Post by Don McDowell »

Looking good.
User avatar
Hobie
Moderator
Posts: 13902
Joined: Sat Mar 31, 2007 1:54 pm
Location: Staunton, VA, USA
Contact:

Re: OT: Update on my Blacksmithing

Post by Hobie »

:mrgreen:
Sincerely,

Hobie

"We are all travelers in the wilderness of this world, and the best that we find in our travels is an honest friend." Robert Louis Stevenson
User avatar
JReed
Advanced Levergunner
Posts: 5509
Joined: Tue Apr 03, 2007 11:17 am
Location: SoCal

Re: OT: Update on my Blacksmithing

Post by JReed »

Idiot wrote:
Oh, you need a proper anvil - more easily said than done. :wink:
I know but this works for now. I have linked up with the local Blacksmithing group. One of the guys has a large piece of a backhoe (we think) that weighs about 125lb with good flats and nice angles on it that he offered to me. I will have to take him up on it. :D

As to the size it is plenty big for most projects I have in mind. I will have to take a pic with some thing for scale but the table is a lid off of a 55gal drum so not exactly tiny.

Joe
The problem with using this to melt lead is the temps are so high. I got distracted and melted a good bit off the end of a piece of 3/8" rebar. :shock:

JB
Thanks. As to my warning I don't have personal experience but have been told by many old hands and read of enough accidents to not risk it. Safety First

Hobie you should give it a try beating stuff with something heavy is fun :D

All told I have about $60 invested in it. Considering mine and y'alls gun hobbie's this is a financial breath of fresh air :lol:. I even found a source for coal @ $17.50 for a bag of 50lb much cheaper then the charcoal I have been using @ $6.75 for a 10lb bag.
Jeremy
GySgt USMC Ret

To err is human, To forgive is devine, Neither of which is Marine Corps policy
Semper Fidelis
User avatar
Old No7
Advanced Levergunner
Posts: 3600
Joined: Tue Dec 18, 2007 9:06 pm
Location: Southern Maine

Re: OT: Update on my Blacksmithing

Post by Old No7 »

"The hair dryer is on its lowest setting I found out quick that putting it on high sends flaming coals 3' in the air!"
Pictures Gunny!!! :shock:

We wanna see pictures of THAT!!! :wink:

Old No7
"Freedom and the Second Amendment... One cannot exist without the other." © 2000 DTH
User avatar
CowboyTutt
Advanced Levergunner
Posts: 3716
Joined: Tue Sep 11, 2007 8:27 pm
Location: Mission Viejo, CA

Re: OT: Update on my Blacksmithing

Post by CowboyTutt »

Man, that is so cool Jeremy! Thanks for the pics. I have enough hobbies to feed but that really does look neat.

-Tutt
"It ain't dead! As long as there's ONE COWBOY taking care of ONE COW, it ain't dead!!!" (the Cowboy Way)
-Monte Walsh (Selleck version)

"These battered wings still kick up dust." -Peter Gabriel
User avatar
JReed
Advanced Levergunner
Posts: 5509
Joined: Tue Apr 03, 2007 11:17 am
Location: SoCal

Re: OT: Update on my Blacksmithing

Post by JReed »

Old No7 wrote:
"The hair dryer is on its lowest setting I found out quick that putting it on high sends flaming coals 3' in the air!"
Pictures Gunny!!! :shock:

We wanna see pictures of THAT!!! :wink:

Old No7
Sorry I was to busy ducking and trying to hit the off button. :lol:
Jeremy
GySgt USMC Ret

To err is human, To forgive is devine, Neither of which is Marine Corps policy
Semper Fidelis
User avatar
claybob86
Senior Levergunner
Posts: 1907
Joined: Mon Apr 02, 2007 10:41 pm

Re: OT: Update on my Blacksmithing

Post by claybob86 »

This is fascinating, Jeremy! Keep it coming! :)
Have you hugged your rifle today?
User avatar
gamekeeper
Spambot Zapper
Posts: 17455
Joined: Thu Sep 06, 2007 3:32 pm
Location: Over the pond unfortunately.

Re: OT: Update on my Blacksmithing

Post by gamekeeper »

claybob86 wrote:This is fascinating, Jeremy! Keep it coming! :)
+ 1 :)
Whatever you do always give 100%........... unless you are donating blood.
20cows
Advanced Levergunner
Posts: 2278
Joined: Tue Apr 03, 2007 9:55 pm
Location: East West Texas

Re: OT: Update on my Blacksmithing

Post by 20cows »

I haven't found a source for coal around here, so I made a gas forge. It works like it's supposed to, but it looks like you're getting more heat. And being open looks easier to work.
User avatar
JReed
Advanced Levergunner
Posts: 5509
Joined: Tue Apr 03, 2007 11:17 am
Location: SoCal

Re: OT: Update on my Blacksmithing

Post by JReed »

20cows wrote:I haven't found a source for coal around here, so I made a gas forge. It works like it's supposed to, but it looks like you're getting more heat. And being open looks easier to work.
Right now I am using Royal Oak charcoal straight from Wal-Mart. When I go back out west I will switch to gas due to fire hazard. But yes I am getting plenty of heat enough to melt mild steel. The openness is easy to work with and I can roast marshmallows for the kids while I wait for the work to come up to temp. :lol:

At the bottom of my signature is the link to my blog on the IForgIron site. That I am trying to keep as a journal on my adventures.
Jeremy
GySgt USMC Ret

To err is human, To forgive is devine, Neither of which is Marine Corps policy
Semper Fidelis
User avatar
Ysabel Kid
Moderator
Posts: 27893
Joined: Mon Sep 17, 2007 7:10 pm
Location: South Carolina, USA
Contact:

Re: OT: Update on my Blacksmithing

Post by Ysabel Kid »

Great job Jeremy! Heck, you'll be able to crank out (or should I say, "hammer out") a companion sword to your NCO sword in no time! I'm glad you did this to save your back. Anyone, anywhere, anytime now had my full sympathies on any kind of back issues!!!
Image
User avatar
JReed
Advanced Levergunner
Posts: 5509
Joined: Tue Apr 03, 2007 11:17 am
Location: SoCal

Re: OT: Update on my Blacksmithing

Post by JReed »

Wanted to get out today and get her lit and get some more pic's and possibly a video. But mother nature had other ideas and caused it to rain all day. Hopefully tomorrow will be better and I can get out and have some fun.
Jeremy
GySgt USMC Ret

To err is human, To forgive is devine, Neither of which is Marine Corps policy
Semper Fidelis
User avatar
Griff
Posting leader...
Posts: 20864
Joined: Sat Mar 31, 2007 4:56 pm
Location: OH MY GAWD they installed a STOP light!!!

Re: OT: Update on my Blacksmithing

Post by Griff »

Wished I had pics of my old setup in the back of my p/u. I have a coupla suggestions:

1. Make your grate replaceable. You will eventually burn thru the one you have. I used a round 1/2" thick piece of steel that I cut the holes in with a torch. I had the fabricator turn edge on a bevel so that it would just be slip fit into my air inlet. If I could have afforded it, I would have had him make them so they'd slip down into the airbox with a nice lip to hold them in place. The bevel was the cheap solution, easy to remove and drop in. Even bouncing around in the back of the p/u, I didn't have one bounce out in the year & ½ I was shoein' full time.

2. Find a variable speed fan. Bein' as my setup was 12 volt, I used a heater motor outta some ol' car and a reostat to regulate the speed. If that pic is on low speed, you'll really like being able to slow it even more. Looks good.

Keep you eyes open on craig's list etc... there are still inexpensive anvils out there. Wished I'd kept the one I bought in '74... sold it in '78 and had to replace it when I moved to TX and started shoein' again. Cost me nearly twice as much.
Griff,
SASS/CMSA #93
NRA Patron
GUSA #93

There is a fine line between hobby & obsession!
AND... I'm over it!!
No I ain't ready, but let's do it anyway!
Nath
Advanced Levergunner
Posts: 8660
Joined: Sat Sep 08, 2007 1:41 pm
Location: England

Re: OT: Update on my Blacksmithing

Post by Nath »

Now thats impressive :D I like your little anvil too :D

Nath.
Psalm ch8.

Because I wish I could!
User avatar
JReed
Advanced Levergunner
Posts: 5509
Joined: Tue Apr 03, 2007 11:17 am
Location: SoCal

Re: OT: Update on my Blacksmithing

Post by JReed »

Griff
Thanks for the suggestions. Great minds think alike. :D I have already been making a list of improvements.

To address the air flow I have plans to make a damper to replace the cap on the bottom so that I can more accurately control the air.

The grate is replaceable. It is simply clamped between the floor flange and the break drum just undue the bolts and I pop in a new one.

I have also been watching Ebay and Craigs list for an anvil I am also keeping my eyes open for hammers and hardy tools.
The nice thing about this set up is every thing is threaded together making it easy to break down so I can throw it in the trunk and take it places. I plan on taking it to next months blacksmiths meeting. :D
Jeremy
GySgt USMC Ret

To err is human, To forgive is devine, Neither of which is Marine Corps policy
Semper Fidelis
Idiot
Levergunner 3.0
Posts: 767
Joined: Fri Feb 22, 2008 1:56 pm
Location: Southwest USA

Re: OT: Update on my Blacksmithing

Post by Idiot »

JReed wrote:I have also been watching Ebay and Craigs list for an anvil I am also keeping my eyes open for hammers and hardy tools.
The problem with finding good used anvils is in large part due to all the muffinoids thinking they're sculpture and paying art prices for them. I still see good anvils around but instead of being tagged a reasonable price they're now running a few hundred dollars or more. The same group of folks did the same thing with old serviceable crosscut saws. They found them on their weekend adventures, envisioned them with flowers pasted on them, and snagged 'em up to put on their kitchen walls. So instead of riding in the back of my truck ready to cut a tree to burn later these fine tools are collecting dust and the stench of burnt coffee with a third grader's patch of yellow flowers scrolled across 'em. "Now ain't that America..."
User avatar
JReed
Advanced Levergunner
Posts: 5509
Joined: Tue Apr 03, 2007 11:17 am
Location: SoCal

Re: OT: Update on my Blacksmithing

Post by JReed »

Idiot
I am sure running into that problem. Most are going for $2 a Lb. It don't sound like much until you realize I am looking for something in the 150lb + weight class man $2 bucks adds up fast.
Jeremy
GySgt USMC Ret

To err is human, To forgive is devine, Neither of which is Marine Corps policy
Semper Fidelis
User avatar
Griff
Posting leader...
Posts: 20864
Joined: Sat Mar 31, 2007 4:56 pm
Location: OH MY GAWD they installed a STOP light!!!

Re: OT: Update on my Blacksmithing

Post by Griff »

Jeremy,

I've owned two anvils now... a 125lb Texas back in the '70s when I first started shoein', and now a 90lb NC Tool. I like the 90lb NC best. On a good stable stand it's really all that one needs. That 125lbs gets rather heavy, not so bad when you're 25, but at 60... aye Gawd it's too much!
Griff,
SASS/CMSA #93
NRA Patron
GUSA #93

There is a fine line between hobby & obsession!
AND... I'm over it!!
No I ain't ready, but let's do it anyway!
User avatar
JReed
Advanced Levergunner
Posts: 5509
Joined: Tue Apr 03, 2007 11:17 am
Location: SoCal

Re: OT: Update on my Blacksmithing

Post by JReed »

Griff
I got to strike on a 200lb anvil at this months meeting. Man did that make moving metal easy a lot like warm butter. The stand does play a big part. I don't mind the heavy weight as I will not be moving it around once I mount it to a stand but for shoeing I can see why the 90 works for ya.
Jeremy
GySgt USMC Ret

To err is human, To forgive is devine, Neither of which is Marine Corps policy
Semper Fidelis
Gobblerforge
Senior Levergunner
Posts: 1504
Joined: Tue Sep 04, 2007 1:02 pm
Location: Eastern Ohio, Foothills of Appalachia
Contact:

Re: OT: Update on my Blacksmithing

Post by Gobblerforge »

Nice job there Jeremy. You were told correctly about the galvenized metal and the replacable grate for the forge. A simple damper can slow the air down. Once temp is up, the fire can be held there with very little air. The blacksmiths bellows as well as most hand cranked blowers are designed for large volume/low preasure air flow. Exactly as you described is the result of high preasure air. Quality coal is a blessing once you have had a chance to burn some and it becomes clear what stuff coal is when you get some. By the way, chances are you are not melting your steel but are instead burning it. This comes from the high heat being an oxigen rich environment. To melt iron or steel, foundrys replace a lot of oxigen with other gas in a controled fire. Not us blacksmiths. We try to shove oxigen in by the bucket load. Hence the burn. This just comes with practice. Just curious what club you said you were getting involved with. I know a few of the Indianna boys and they are a good lot. If you mention my name you might get some good storys. But if they don't have pictures I didn't do it. :wink: Every club I've had the pleasure of being involved in was a blessing. Blacksmith groups are just like that. Everybody learned from someone and everyone enjoys sharing their tips and tricks. I am out of town right now but on the 8th of May I am hosting a hammer in. If you could find your way to Ohio, you would be more than welcome to attend.
Gobbler
Click Click Boom
Idiot
Levergunner 3.0
Posts: 767
Joined: Fri Feb 22, 2008 1:56 pm
Location: Southwest USA

Re: OT: Update on my Blacksmithing

Post by Idiot »

JReed wrote:Griff
I got to strike on a 200lb anvil at this months meeting. Man did that make moving metal easy a lot like warm butter. The stand does play a big part. I don't mind the heavy weight as I will not be moving it around once I mount it to a stand but for shoeing I can see why the 90 works for ya.
I used a piece of railroad iron for horse shoeing and it worked well. But for heavy blacksmithing, including knife and parts making, I think anvils begin at 175 lbs.
User avatar
JReed
Advanced Levergunner
Posts: 5509
Joined: Tue Apr 03, 2007 11:17 am
Location: SoCal

Re: OT: Update on my Blacksmithing

Post by JReed »

Gobbler
I have been meeting with The Maumee Valley Blacksmiths an off shoot of the Indiana Blacksmiths Association. Small group but good guys. I would really like to go on the 8th but I have to be down in Indianapolis on that day :( I would rather be out with you all.

Idiot
Your right RR track is great for small stuff but boy is it a work out to work larger pieces on.
Jeremy
GySgt USMC Ret

To err is human, To forgive is devine, Neither of which is Marine Corps policy
Semper Fidelis
madman4570
Advanced Levergunner
Posts: 6747
Joined: Thu Mar 19, 2009 9:30 am
Location: Lower Central NYS

Re: OT: Update on my Blacksmithing

Post by madman4570 »

Excellent Job! :mrgreen:
User avatar
JReed
Advanced Levergunner
Posts: 5509
Joined: Tue Apr 03, 2007 11:17 am
Location: SoCal

Re: OT: Update on my Blacksmithing

Post by JReed »

Ok solved the Anvil issue. Went to the smiths meeting this morning and picked up this nice whatchamacallit.
Image

It took 2 of us to get it into the trunk of my car but I was able to get it out by my self and onto a dolly so I could move it across the yard. I would judge by my level of effort that it is pushing 200Lb's. Got to do some work on it before the rain set in talk about a vast improvement in performance. Also got to see a demo on how to make a pair of bolt tongs talk about simple.
Jeremy
GySgt USMC Ret

To err is human, To forgive is devine, Neither of which is Marine Corps policy
Semper Fidelis
Post Reply