My cheap plumb brown

Welcome to the Leverguns.Com Forum. This is a high-class place so act respectable. We discuss most anything here ... politely.

Moderators: AmBraCol, Hobie

Forum rules
Welcome to the Leverguns.Com General Discussions Forum. This is a high-class place so act respectable. We discuss most anything here other than politics... politely.

Please post political post in the new Politics forum.
Post Reply
User avatar
JReed
Advanced Levergunner
Posts: 5509
Joined: Tue Apr 03, 2007 11:17 am
Location: SoCal

My cheap plumb brown

Post by JReed »

Seems everyone is on the plumb brown kick as of late and who can blame them. A nicely browned rifle barrel is beautiful thing to look at.
So I thought I would share how I browned the barrel on my TC Renegade.

First things first I am not made of money so my hobies have to be done as inexpensively as posible so that I can get the OK of the CFO ( a.k.a my wife :wink: ). This leads me to find off the wall ways to get the job done some times it works some times it doesn't. Here is some thing that worked.

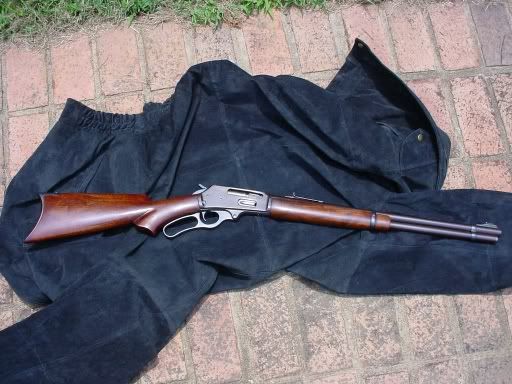
When I came back from my last deployment in Feb. of 2007 I purchased a TC Renegade kit from one of the members here as a project for my boys and I. The barrel and all the metal work was in the white so I had to decide on a finish for the barrel. Since it is a ML I didnt want a blue finish so I started looking around at the browning kits out there on the market. Most of them were in the $15 and up range not including tthe shipping. Since I still wanted money for powder, caps, balls, and patches I started looking for a cheaper way to get the job done.

One day while at Micheals( an arts and crafts store) I was looking at the decritive metal finishes they sell and there it was :idea: .

Image

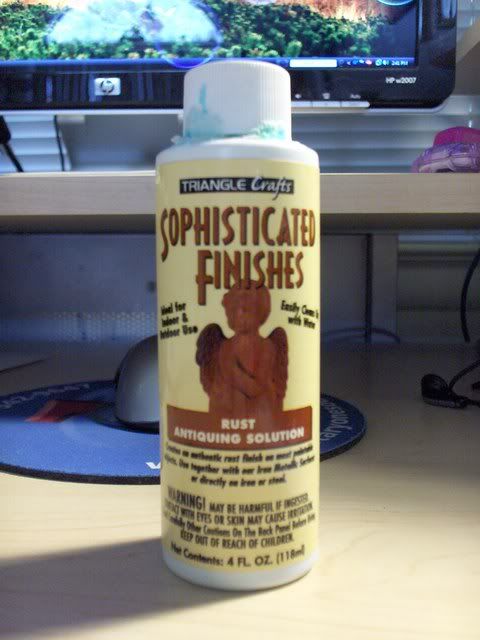
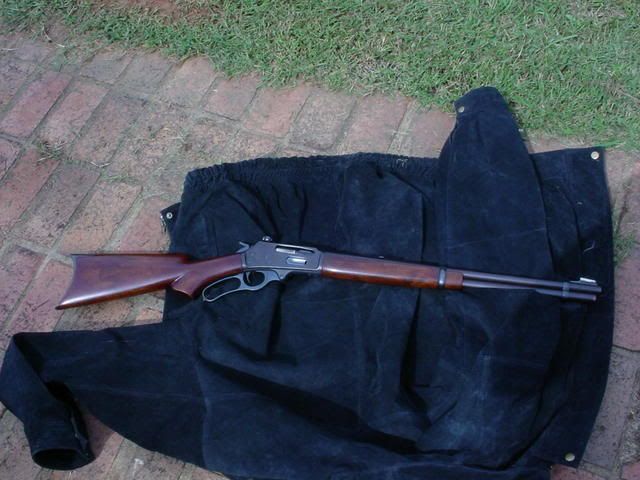
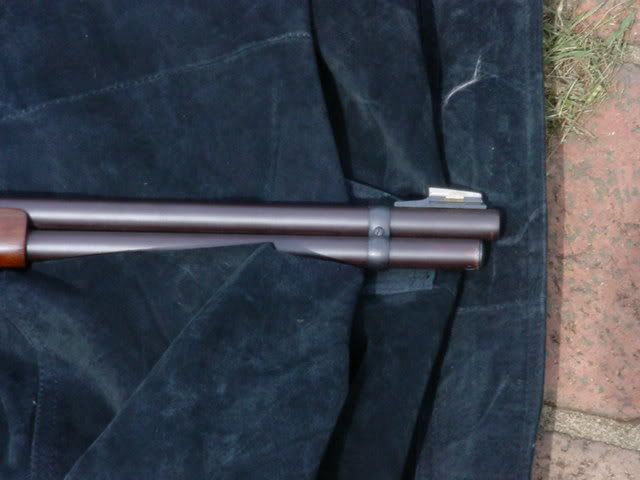
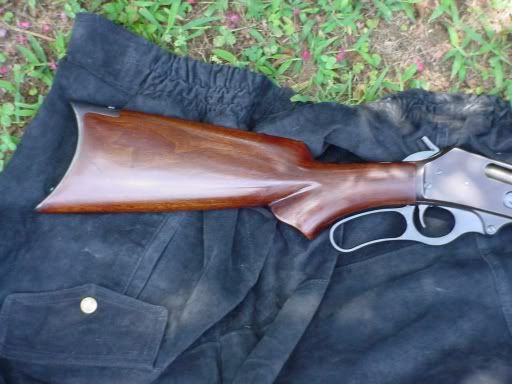
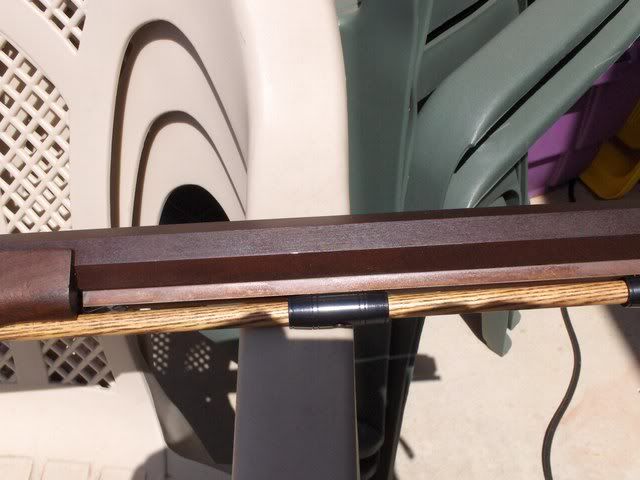
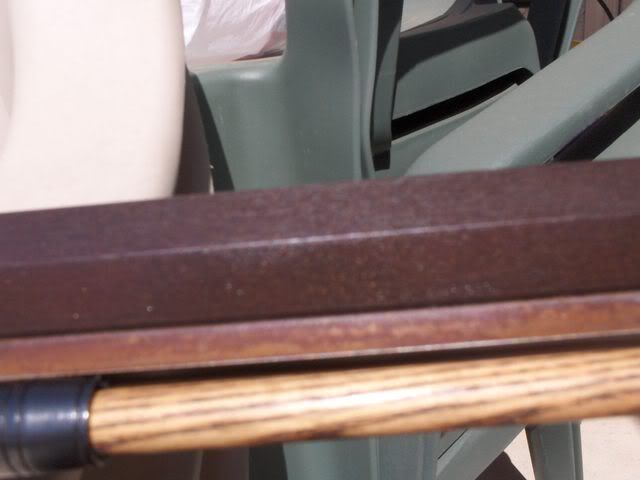
Here was a rusting solution that had the same basic chemicals as the stuff from the gun specific folks and it was $4.50 for 4oz's SWEAT. So I grabed a bottel and headed home. The directions said to wait 24hours between aplications to get the best results. I cleaned the barrel with windex to remove all the oil and dirt from the metal. Then I hund it up from the ceiling on my garage with bailing wire hooked threw the underlug. Next I made a tent using a sheet and put a humidifier under it. I then applied some of the solution to a cotton ball and wiped it on to the metal making sure that I didnt miss anything and left it over night. I applied a coat every day for 3 days. After this time it had browned to the shade I was looking for. At this point I cleaned the barrel with warm soapy water to remove any ttraces of the solution then I put it in the oven @ 200 degrees to dry out the barrel and prepair it for the next step. Once the metal was nice and hot I rubbed it down with 0000 steel wool to remove any scaling that might of ocured then while still hot I gave it a rub down with a paper towel soaked in canola oil. I repeated the heating and oil rub 3 times it was alot like seasoning cast iron and completley stopped the rusting process.

So far the finish has held up well it is resitant to scratches and looks darn good if I do say so myself.

Image
Image
Image
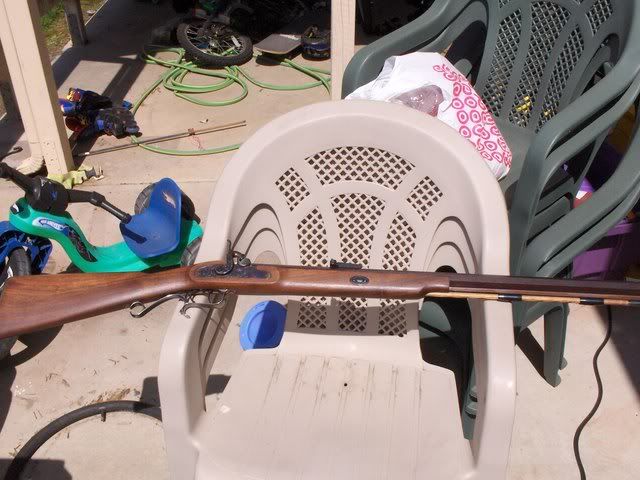
please excuse my messy back patio kids love to throw stuff every where. :wink:
Jeremy
GySgt USMC Ret

To err is human, To forgive is devine, Neither of which is Marine Corps policy
Semper Fidelis
User avatar
2ndovc
Advanced Levergunner
Posts: 9352
Joined: Fri Sep 07, 2007 11:59 am
Location: OH, South Shore of Lake Erie

Post by 2ndovc »

That's pretty darned neat. Might have to try that!

8)
jasonB " Another Dirty Yankee"


" Tomorrow the sun will rise. Who knows what the tide could bring?"
Ron Macy
Levergunner 1.0
Posts: 51
Joined: Tue Feb 26, 2008 1:03 pm
Location: Indiana

Post by Ron Macy »

That's a good effect. Price is right where many of us can afford to experiment with it. Nice work.
User avatar
Hobie
Moderator
Posts: 13902
Joined: Sat Mar 31, 2007 1:54 pm
Location: Staunton, VA, USA
Contact:

Post by Hobie »

I was looking at the gun, you have a patio? :lol: Don't worry about it. When the kids are grown you'll miss it (or be doing it yourself). :wink:

BTW, the finish looks really even to me. That's good! I think you did well by that kit.
Sincerely,

Hobie

"We are all travelers in the wilderness of this world, and the best that we find in our travels is an honest friend." Robert Louis Stevenson
jnyork
Advanced Levergunner
Posts: 4426
Joined: Wed Sep 12, 2007 12:33 pm
Location: Wyoming and Arizona

Post by jnyork »

Good job, looks great, I will file this trick away for future reference. Thanks.
Pisgah
Senior Levergunner
Posts: 1803
Joined: Thu Sep 06, 2007 9:01 pm
Location: SC

Post by Pisgah »

I refinished an abused 336, and browned the barrel, receiver, and mag tube using Laurel Mtn. Forge solution, probably identical to what you used. It turned out beautifully, and has proven a tough, hard-wearing finish.

You can get a denser, finer-grained finish if you card and rinse between applications of the solution. Some of these browning preparations can be used to rust blue, as well, by boiling the parts in the final rinse.
El Mac
Levergunner 2.0
Posts: 483
Joined: Fri Aug 31, 2007 7:54 pm
Location: Colorado! (i.e., North Texas)

Post by El Mac »

Nicely done! Thanks to you and Pisgah for the tips!
User avatar
JReed
Advanced Levergunner
Posts: 5509
Joined: Tue Apr 03, 2007 11:17 am
Location: SoCal

Post by JReed »

I have taken it out after pigs and coyotes a couple times through some thick brush and it has held up well. I could of gotten a smoother finish if I had polished the barrel first but I think it came out nice.
Jeremy
GySgt USMC Ret

To err is human, To forgive is devine, Neither of which is Marine Corps policy
Semper Fidelis
User avatar
Andrew
Advanced Levergunner
Posts: 2043
Joined: Thu Sep 06, 2007 5:30 pm
Location: Southern Missouri

Post by Andrew »

I wasn't sure what I thought about "browning" at first but, it's growing on me. My ML needs some finnish and I think that looks pretty good. 8)
ImageImage
Qui tacet consentit. (silence implies consent)
The Boring Blog
jdad
Advanced Levergunner
Posts: 3435
Joined: Fri Sep 07, 2007 7:55 am
Location: Oregon

Post by jdad »

That looks great!
User avatar
Griff
Posting leader...
Posts: 20864
Joined: Sat Mar 31, 2007 4:56 pm
Location: OH MY GAWD they installed a STOP light!!!

Post by Griff »

Yep, you definitely did better by your kit than I did by mine. And, there is just "something" about browned steel that seems rich. One of the nicest pair of spurs I have are a pair of E. Garcias that are browned with some nice silver inlay. His blued ones are very nice, but this browned pair are just... well... distinctive! :o As is that rifle.
Griff,
SASS/CMSA #93
NRA Patron
GUSA #93

There is a fine line between hobby & obsession!
AND... I'm over it!!
No I ain't ready, but let's do it anyway!
User avatar
JReed
Advanced Levergunner
Posts: 5509
Joined: Tue Apr 03, 2007 11:17 am
Location: SoCal

Post by JReed »

Thanks Gents.

I have a Rossi SxS that I have been thinking of browning the blueing is getting thin so it wouldnt hurt it any. I still have enough left to do another gun. May be that will be a project for Memorial Day weekend.
Jeremy
GySgt USMC Ret

To err is human, To forgive is devine, Neither of which is Marine Corps policy
Semper Fidelis
20cows
Advanced Levergunner
Posts: 2278
Joined: Tue Apr 03, 2007 9:55 pm
Location: East West Texas

Post by 20cows »

Nice job!
Rusty
Advanced Levergunner
Posts: 9528
Joined: Mon Sep 03, 2007 6:37 pm
Location: Central Fla

Post by Rusty »

Jeremy,
That is a great lookin finish. You even managed to do something that a lot of higher priced guns don't. you seem to have made the finish EVEN! I don't know how many rifles I've seen that have a browned finish that has dark spots and light spots.

Primitive is not another word for crude. Ya done good!
If you're gonna be stupid ya gotta be tough-
Isiah 55:8&9

It's easier to fool people than it is to convince them they have been fooled.
Pisgah
Senior Levergunner
Posts: 1803
Joined: Thu Sep 06, 2007 9:01 pm
Location: SC

Post by Pisgah »

I just realized this was another opportunity to post another pic of my favorite leveraction project! :D

Image

Receiver, barrel, mag tube browned. Smaller parts nitre blued.
BenT
Advanced Levergunner
Posts: 2719
Joined: Thu Sep 06, 2007 9:21 pm
Location: Northern Wisconsin

Post by BenT »

Pisgah I have never seen a picture of that gun before. :wink:


My father in law gave me his muzzleloader project gun . It needs a different finish . I know what I'll be trying on it now . Thanks for the info.
User avatar
Rimfire McNutjob
Advanced Levergunner
Posts: 3156
Joined: Mon Sep 03, 2007 2:51 pm
Location: Sanford, FL.

Post by Rimfire McNutjob »

Pisgah wrote:Receiver, barrel, mag tube browned. Smaller parts nitre blued.
Nice looking gun.
... I love poetry, long walks on the beach, and poking dead things with a stick.
El Mac
Levergunner 2.0
Posts: 483
Joined: Fri Aug 31, 2007 7:54 pm
Location: Colorado! (i.e., North Texas)

Post by El Mac »

Pisgah wrote:I just realized this was another opportunity to post another pic of my favorite leveraction project! :D

Receiver, barrel, mag tube browned. Smaller parts nitre blued.
Pisgah, any way you could post some close ups of the gun? From this angle, it all looks blued.
Pisgah
Senior Levergunner
Posts: 1803
Joined: Thu Sep 06, 2007 9:01 pm
Location: SC

Post by Pisgah »

El Mac wrote:
Pisgah wrote:I just realized this was another opportunity to post another pic of my favorite leveraction project! :D

Receiver, barrel, mag tube browned. Smaller parts nitre blued.
Pisgah, any way you could post some close ups of the gun? From this angle, it all looks blued.
Lousy camera and photographer! :D The barrel and mag tube browned, barrel band and sight base nitre blued.
Image

Blued hammer, loading gate, lever, screws.
Image

The buttplate is blued, but doesn't show up well here.
Image

This one was before I changed the sights.
Image
nemhed
Senior Levergunner
Posts: 1195
Joined: Sat Dec 22, 2007 2:36 pm

Post by nemhed »

JReed, That T/C looks good. I've got a Renegade I put together about 17 years ago. I like the style because it lacks the shiny brass furniture, and the double set triggers are a hoot. Mine's seen enough abuse from foul weather and Pyrodex use that I should just give it a browning now.
El Mac
Levergunner 2.0
Posts: 483
Joined: Fri Aug 31, 2007 7:54 pm
Location: Colorado! (i.e., North Texas)

Pisgah

Post by El Mac »

That is a beautiful rifle!
ernest haycox
Levergunner
Posts: 25
Joined: Sat Mar 01, 2008 12:33 pm

Post by ernest haycox »

Both fine looking rifles!Pisgah,any way you could give us more detail on the work you did on that beautiful Marlin?I have a new Marlin 336 that needs wood and a barrel and I envisioned it when done looking very much like yours.Course that would take a lot more skill than I have had as yet.Is that a Treebone stock and forend?What finish did you use?Was it hard to fit?Anyway,absolutely beautiful rifle.Thanks for the pics,fellas.
Pisgah
Senior Levergunner
Posts: 1803
Joined: Thu Sep 06, 2007 9:01 pm
Location: SC

Post by Pisgah »

ernest haycox wrote:Both fine looking rifles!Pisgah,any way you could give us more detail on the work you did on that beautiful Marlin?I have a new Marlin 336 that needs wood and a barrel and I envisioned it when done looking very much like yours.Course that would take a lot more skill than I have had as yet.Is that a Treebone stock and forend?What finish did you use?Was it hard to fit?Anyway,absolutely beautiful rifle.Thanks for the pics,fellas.
It was a very satisfying project -- and an easy one. The main ingredients were patience and elbow grease.

A local pawnshop bought a bunch of confiscated guns from a police department. I was tipped off, and went in the day the guns were delivered, still filthy dirty and piled in boxes. In the mix was a 1971 336. There was a bit of rust, and some very light pitting in a few spots, and the ejector was broken. The stock was banged up, but good enough to give to a buddy who had a project going. I got it for $90.

First step -- a complete stripping , examination, and cleaning of every part. Once that was done, I began the browning process, which I carried on for 5 days. Small parts were nitre blued. a process using a bath of melted saltpeter crystals (stump remover crystals, available at any lawn/garden store). Nothing tough about the process, you just need to exercise extreme caution because liquid saltpeter is HOT!!

I kept the original forestock, and just thinned it down. The buttstock and buttplate were ordered from Precision Gunworks. The stock was 90% finished, and the buttplate was unpolished and undrilled for screws. I borrowed a buddy's drillpress for 10 minutes and drilled the holes, then hand-polished it. The buttstock required minor fitting, and considerable sanding. The wood was stained with Kelly's Cobler Leather Dye, medium brown, heavily diluted with rubbing alcohol. I've used this stuff before, and it is great for getting the reddish stain of old Winchesters. The wood was finished with many (at least 20) hand-rubbed coats of TruOil, over about a 2 week period.

If I'd had nothing else to do, I could have done the job in a couple of days. I'm glad I had other things to do, because it forced me to take my time. I can't say how many hours I spent, but cash cost was about $200. Later, I added a vintage all-steel Lyman receiver sight ($35 on eBay) and a silver blade front sight ($3.75, I think, from Dixie Gun Works).

The end result was just what I wanted and, so far, different from any other 336 I've seen. It draws a lot of favorable comments and, frankly, I am proud of the work.
El Mac
Levergunner 2.0
Posts: 483
Joined: Fri Aug 31, 2007 7:54 pm
Location: Colorado! (i.e., North Texas)

Post by El Mac »

Pisgah wrote: ...and, frankly, I am proud of the work.
And well you should be! A 'one of a kind' custom!
ernest haycox
Levergunner
Posts: 25
Joined: Sat Mar 01, 2008 12:33 pm

Post by ernest haycox »

Thanks,Pisgah.My Marlin I got for 80 dollars.A co-workertold me his brother was selling it,fired a few rounds thru it,got mad at a relative and clubbed a telephone pole with the poor Marlin,breaking the stock.Then he threw it in a mud puddle where the last two inches of brand new barrel got ruined.I could cut it down to 16 inches but I like the balance of a 20 inch barrel so I have decided to send it to Marlin Company for a rebarrel. The forend is very nice wood so I just need a stock.Fixing up Marlin rifles is very satisfying,I could see myself doing this often,especially as they can take a beating and usually just need a little cosmetic tlc.
Jaguarundi
Senior Levergunner
Posts: 1804
Joined: Tue Feb 19, 2008 3:27 am
Location: Wiregrass Area,Alabama

Post by Jaguarundi »

JReed & Pisgah,nice work and thanks for posting pictures 8) !
"Those who hammer their guns into plows will plow for those who do not."
User avatar
JReed
Advanced Levergunner
Posts: 5509
Joined: Tue Apr 03, 2007 11:17 am
Location: SoCal

Post by JReed »

It looks so much better in person in my opinion. I will let you know how the Rossi turns out when I get it done.
Jeremy
GySgt USMC Ret

To err is human, To forgive is devine, Neither of which is Marine Corps policy
Semper Fidelis
User avatar
Ysabel Kid
Moderator
Posts: 27903
Joined: Mon Sep 17, 2007 7:10 pm
Location: South Carolina, USA
Contact:

Post by Ysabel Kid »

Jeremy - that is awesome. Of course, given that I paid to have someone do it a number of years ago, now I think I'm going to be sick... :(
Image
User avatar
JReed
Advanced Levergunner
Posts: 5509
Joined: Tue Apr 03, 2007 11:17 am
Location: SoCal

Post by JReed »

Ysabel Kid wrote:Jeremy - that is awesome. Of course, given that I paid to have someone do it a number of years ago, now I think I'm going to be sick... :(
Well now you know how to do it for the next gun. :wink: :D
Jeremy
GySgt USMC Ret

To err is human, To forgive is devine, Neither of which is Marine Corps policy
Semper Fidelis
Post Reply