Forum rules
Welcome to the Leverguns.Com General Discussions Forum. This is a high-class place so act respectable. We discuss most anything here other than politics... politely.
Please post political post in the new Politics forum.
Dang thats nice, might have to make if ya don`t mind.
Because I Can, and Have
-------------------------------------------------------------
USAF-72-76
God Bless America.
Disclaimer, not responsible for anyone copying or building anything i make.
Always consult an expert first.
I love them! What did you use for raw materials, and how did you shape them? I made a very crude set of shooting sticks (cut 2 hardwood saplings, wrapped the uppers in leather thongs) but would love to know more about the process...
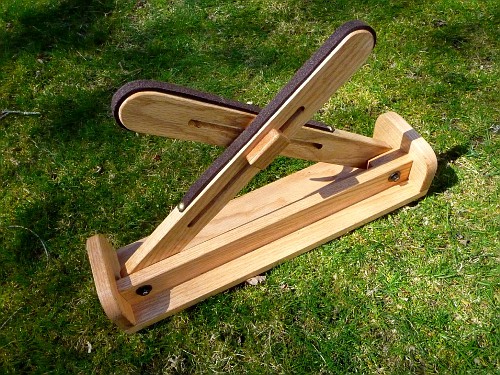
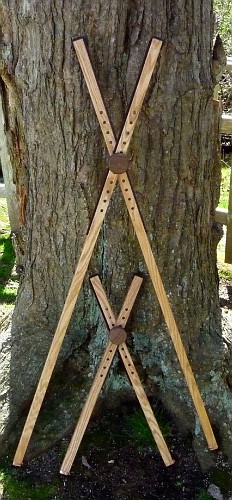
Everything there was cut from one 8' piece of 3/4 X 8" Oak board. (I actually made a second set of cross sticks for my buddy out of this board)
All pieces were cut on a $300 table saw and the edges rounded over with a router. The holes were done on a drill press. All pretty simple woodworking. The hardest part was routing the slots. This I did on a small router table I rigged up on one of the extensions on my table saw. I drilled a hole in the extension and mounted a router from below. Worked great!
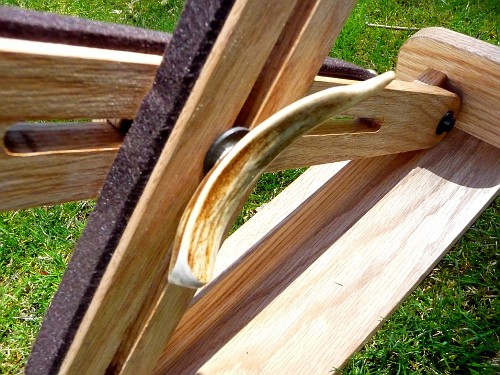
The Deer antler "knob" was cut from an old deer antler I had hanging around. Drilled a hole in the backside and epoxied a 5/6 bolt to it. A "T" nut was epoxied into the sliding block on the rear and a thin piece of oak glued over the top so you can't see it.
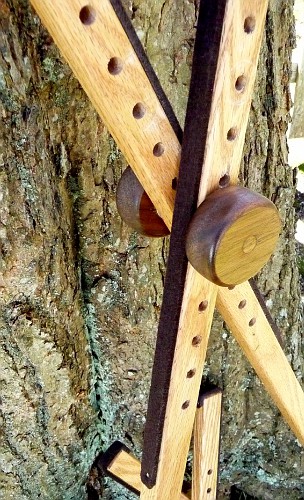
The copper rings on the legs of the cross sticks were cut from a piece of copper tubing I bought at Lowes. Hammered into shape and crimped over with a set of vice grips and a hammer.
The "points" on the legs were made from 1/4-20 bolts and then cold blued.
All the hardware on the benchrest was also cold blued after the zinc plating was sanded off.
The felt was found at the Dollar store. It is used under furniture so it doesn't scratch the floor. It is 1/2" wide and has a self adhesive backing. A couple upholstery tacks hold the ends from coming undone.
The walnut knobs on the cross sticks were cut with a hole saw from a piece of scrap. A couple bolts were epoxied into one side and "T" nuts on the other.
Lots of fun making this stuff and now I feel "Period Correct" when shooting the Rolling Block, 1885 and Sharps!