The walnut furniture was outstanding, bordering on exhibition grade, but it was finished with that ugly Browning high gloss epoxy.
The action was stiff and fast cycling rounds without a leather glove was brutal on your knuckles
The trigger was heavy and gritty. It measured at just over 7 pounds.
The front sight was not working for me. My eyesight up close is far from perfect and the black blade just generally disappeared into the background.
The semi-buckhorn rear sight in combination with the “fuzzy” front blade made for a very slow first shot.
Accuracy was pretty "ho hum" with every factory load I tried and also with hand loads.
Other than these items, it was a great saddle gun and mighty purdy to boot.
I started with items 2 and 3 and after carefully researching the 1886 schematics on the internet, I tackled the trigger and smoothing out the action the best way possible. I sent it off to “Nate Kiowa Jones.” About thirty days later I had it back. The action was smooth as butter and sounded like a precision, albeit very large, machine being brought into battery and locking up. The trigger now was crisp and broke at 3 3/4 pounds. Unfortunately the great new trigger did little to improve the groups. So two of the six concerns were addressed.
The next Item I chose to solve was the front sight. I knew I would never be able to hit anything reliably until I found a way to see the front sight from early dawn to late dusk, no matter the weather. The best front sights I had been able to use lately had been green or red fiber optic sights, especially the green. The problem was the front sight on this carbine was not a dovetailed ramp, but was a thin blade pinned between two small square blocks of steel that were soldered to the barrel between the muzzle and the front barrel band. I drove out the pin and removed the front blade so I could mic it. It turns out the the original blade was exactly the same thickness as the fiber optic blades used by Freedom Arms on their fine model 83 and 97 single action revolvers. Even better, Freedom arms offers these sight blade in several heights and in both green and red fiber optic. It seemed all I would have to do is to order several different heights (to allow for elevation adjustment at the front end if needed) in green fiber and grind off the bottom dovetailed section that Freedom Arms uses to secure the blade in the front sight slot. Then it should have been a simple matter to mark the location of the pin hole and drill the blade so the pin could secure it to my carbine. Simple right. Well not exactly. It turns out Freedom Arms must use kryptonite or some similar metal for these blades. The only way I could grind off the bottom of the blades was with a ceramic cutting wheel and then to smooth the base flat again it took patient stroking on a diamond hone. So now I had several different height green fiber optic blades that fit perfectly between the front sight blocks on the 1886. All I had to do now was drill the pin hole for the tiny cross pin that would secure them in place. So about 8 or 9 high speed steel, cobalt, titanium etc tiny bits later I had a pile of broken drill stock and the first sight blade with a small silver scratch in the blackened finish. Did I mention how hard these Freedom Arms sight blades are. At this point I headed off to find a machine shop and my search finally led me to a metal fabricator where I learned about a process called electrical discharge machining or EDM. It turns out they can burn an exact diameter “pin” hole at an exact location through an extremely small extremely hard metal part and never bother the hardness of the metal. In fact they did not even need to remove the green fiber pipe from the blade. So now I had my highly visible front sight in several heights to allow for additional elevation adjustment if needed and it fit the original sight mount blocks.


Three issues down and three to go.
The next project in my mind was to improve the rear sight to improve the ability to get on target quick with the first shot. The quickest sights I know of are red dots, low powered scopes and peep or receiver sights with the aperture removed to allow them to work like a ghost ring. A red dot or a scope were out of the question. I also did not like the idea of mounting a receiver sight like a Lyman or a Williams on the side of my 1886, first because it was not set up for it and would require drilling and tapping the side of the receiver and second because it would cover some of the engraved Elk scene on the side of the receiver. That left a tang sight. I was also not crazy about the idea of a tang sight because I feel they interfere with the handling of the rifle and if they are folded, they are slow. There had to be another solution. That was when I found the Smith Full Buckhorn, Extra Long Range rear sight.

It was available in a 3/8s dovetail that was an exact replacement for my existing ladder sight. I set it up slightly different from a traditional semi buckhorn sight in that I use the large open circle of the full buckhorns like the aperture of a peep or receiver sight. I selected my front sight blade height so that if I centered the green dot of the fiber front in the circle of the buckhorn rear it places my heavy hunting load dead on at 140 yards and never more than 2 1/2 inches high at any point getting there. In this manner it is every bit as quick as a ghost ring for snapping off the first shot. The other great feature of the Smith sight is the flip up “post” section with an adjustable rear notch. This allows for making longer distance shots where you have the time to calculate range and slide the notch to the appropriate height.
I get a big kick out of using this sight arrangement as it always reminds me of the scene from “Lonesome Dove” when Gus gets trapped out on the plains by the renegades with the buffalo rifle and he uses the flip up rear sight to “walk” his shot from his rifle into his adversary. At any rate, The rear sight set up with the Smith sight is an elegant solution to the concern and it maintains the original look and handling of an 1886 carbine.


Four issues down and two to go.
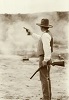
At this point I felt I was ready to tackle the accuracy issues. Even with the smooth action, the great trigger and the very usable sights I was still getting 3 shot groups in the 4 inch range at 50 yards and 5 shot groups would open that up another couple of inches. Mostly it appeared to be vertical stringing, but there was also some windage issues. I remembered reading an article on Leverguns by Paco concerning improving the accuracy of a lever action. I went straight to the barrel band section as I was seeing both vertical stringing and some horizontal issues that I was able to narrow down to unequal pressure shot to shot from my off hand. I figured the barrel bands would be the quickest to address and then I would work on the wood fit of the forearm. The barrel bands did the trick. I am now able to hold 2 inch three shot groups at 100 yards and 5 shots open them up to just under 3 inches. These groups are accomplished with Garrett 420 grain lead +P hammerhead loads rated at 1850 fps. The Garrett ammo is extremely consistent and accurate. To date I have not been able to match it with any hand load although I have several loads that come close. The nice thing about the Garretts though is that they are relatively flat shooting from the muzzle out to 200 yards. I have the sights set to a six o’clock hold is dead on at 140 yards and I do not worry about hold over or under all the way to 180. This works great for me as I try to limit my off hand shots to the 130, 140 yard range. The photo is my 18” x 18” steel plate.

The “smear” on the plate is the result of 50 rounds fired over a five day period. These rounds were fired at 135 yards, as measured by laser range finder, offhand. There are only two bad parts to the Garrett loads, the cost and the recoil. Oh well. Five down and one to go.
Time to address the Browning “plastic” finish. As it turned out, this was both the hardest (my attempts) and ultimately the easiest (the fine work of someone else) part of the project. I started by trying to strip off the Browning epoxy finish myself and tried several brands of stripper, none of which would even mark the epoxy. At that point I met a gentleman by the name of Jeff Waguespack who happens to be in the Dallas, TX area. Jeff is a very talented stock maker / refinisher. He stripped off the epoxy and brought the stock down to bare wood. All I can say is he is a very patient man with a very light touch as he was able to get to bare wood and not impact the wood to metal fit. The wood is still slightly proud of the metal. He also sharpened up all of the checkering. Jeff then applied numerous coats of oil finishing with a final coat hand rubbed to a satin finish. The highly figured walnut shows clear without the commercial plastic look of the previous epoxy finish. And just as important, now you can easily repair any minor scuffs or scrapes from use. I can not speak highly enough of Jeff’s work and an added bonus was his extremely reasonable charge. All six issues resolved and the result is a very capable lever action carbine that anyone would be proud to own carry and use.

Thank you for taking the time to review my project and allowing me to remember the pleasure of each step along the way by sharing it here.